
Want to automatically email people whenever you publish new content on your WordPress site? With Noptin, you can send new post notification emails to newsletter subscribers, registered WordPress users, WooCommerce customers, post authors, or specific email addresses without creating and sending each email manually.
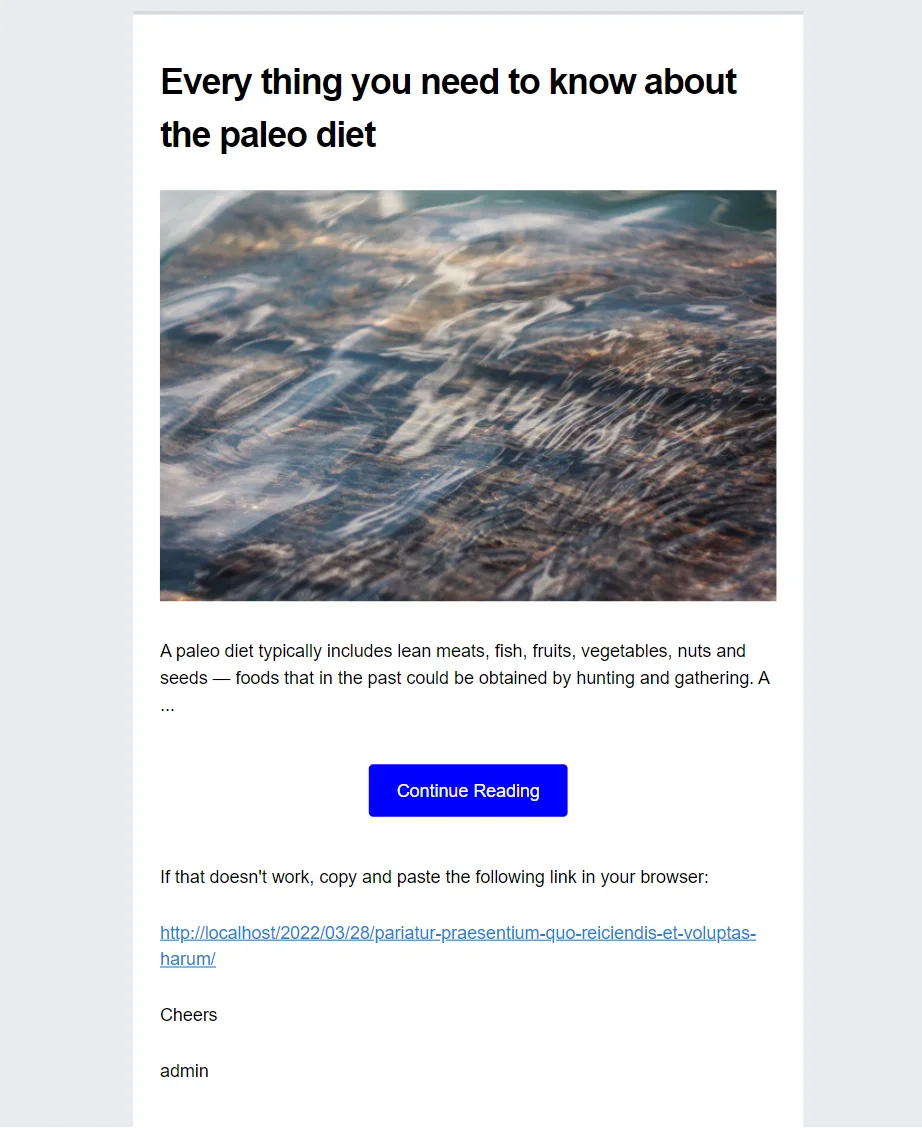
Notifications aren’t limited to blog posts. You can also notify people when you publish new WooCommerce products, events, listings, pages, or other custom post types. You have full control over who receives each email, which posts trigger notifications, and what information appears in the message.
Noptin supports automatic notifications shortly after publication, with optional sending delays. If you prefer fewer emails, you can also send daily, weekly, or monthly post digests containing several recent posts.
In this guide, you’ll learn how to set up automatic new post notifications in WordPress, customize your emails, and choose exactly who receives them.
If you’d rather send scheduled summaries instead of instant notifications, see our guide on sending post digest emails instead.
Let’s get started.
What You’ll Learn
- How to automatically send an email when a post is published in WordPress
- How to notify subscribers of new events, listings, products, or custom post types
- How to choose who receives new post notification emails (Newsletter subscribers, WordPress users, Members, or WooCommerce customers)
- How to control timing, delays, and sending conditions
- How to avoid sending unnecessary or empty notifications
Prerequisites
To follow along with this tutorial, make sure that you’ve installed the latest version of Noptin on your WordPress website.
If you plan to send new post notification emails through an external email service provider, you can also install the appropriate integration, such as Mailchimp, ActiveCampaign, etc.
How to Send New Post Notifications for Custom Post Types
Noptin isn’t limited to regular WordPress blog posts. You can also automatically notify subscribers, WordPress users, or customers whenever you publish content from a custom post type.
For example, you can send automatic email notifications when you publish:
- WooCommerce products: Notify customers about newly added products.
- Events: Email subscribers when you publish a new event.
- Property listings: Alert interested subscribers when a new property becomes available.
- Courses: Notify students when you publish a new course.
- Other custom post types: Send notifications for recipes, jobs, directory listings, or any custom content type registered on your WordPress site.
You can also create separate notification emails for different audiences and content types, giving you full control over who gets notified and when.
Once you know what type of content you want to notify users about, the next step is to create your first new post notification email in Noptin.
In the next section, we’ll walk through the setup step by step.
How to Automatically Send an Email When a WordPress Post Is Published
You can use Noptin to automatically email your newsletter subscribers, WordPress users, or WooCommerce customers whenever you publish new content.
Once you’ve configured a notification, Noptin handles the emails automatically. You won’t need to create a new email campaign every time you publish a post.
Here’s how to set it up.
Step 1: Install and Activate Noptin
If you haven’t already installed Noptin:
- Open your WordPress dashboard and go to Plugins > Add New Plugin.
- Search for Noptin, click Install Now, and then Activate.
If Noptin is already installed, you can skip this step.
Step 2: Create a New Automated Email
From your WordPress dashboard, navigate to Noptin > Emails > Automated Emails and click the New Automated Email button.
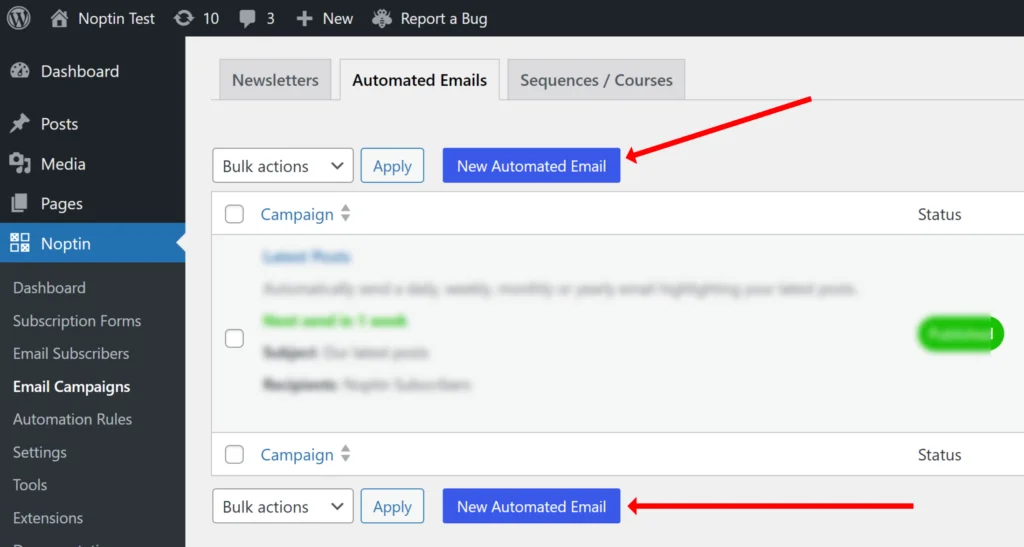
Noptin will open a modal allowing you to select the type of automated email you want to set up.
Step 3: Select New Post Notification
In the modal that opens, select the post type you want to send notifications about from the left sidebar.
For example:
- Posts: Notify subscribers whenever you publish a new blog post.
- Products: Notify customers when you publish a new WooCommerce product.
- Events: Notify subscribers about newly published events.
- Other post types: Send notifications for listings, courses, recipes, or other custom post types.
Next, select New Post Notification.

The post type you select determines which published content can trigger the email.
Step 4: Choose Who Gets an Email When You Publish a Post
Next, choose the people you want Noptin to email.
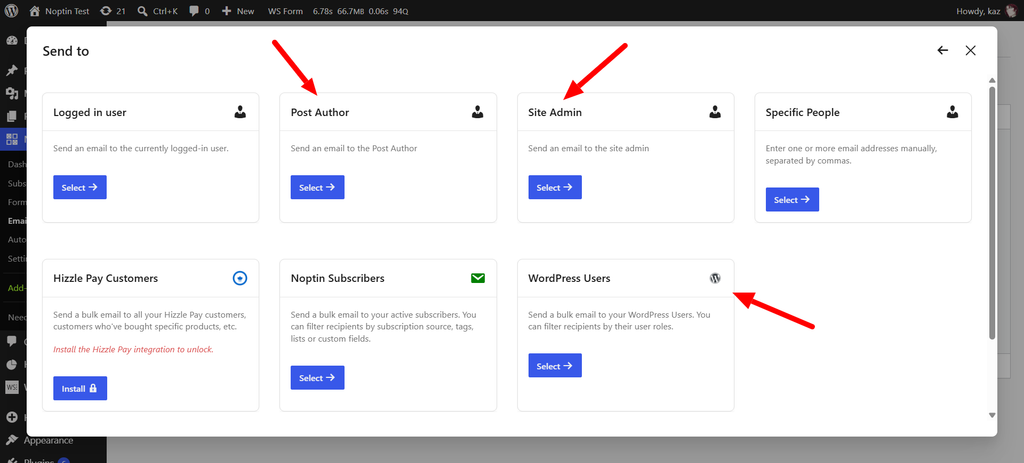
You can send new post notifications to:
| Recipient | Description |
|---|---|
| Manual Recipients | Sends the email to a comma-separated list of email addresses. |
| Noptin Subscribers | Sends a bulk email to your active subscribers. You can filter recipients by their custom fields, tags, lists, or subscription source. |
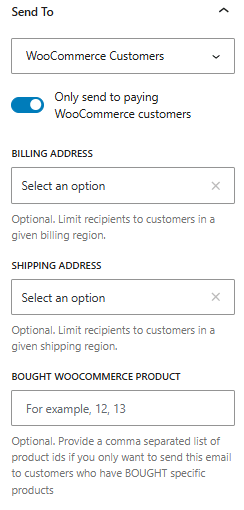
| WooCommerce Customers | Sends a bulk email to all your WooCommerce customers. You can filter recipients by the products they’ve bought, their last order dates, their lifetime spent, or their shipping and billing addresses. |
| WordPress Users | Sends a bulk email to your registered WordPress users. You can filter recipients by their user roles and custom fields. |
| Post Author | Notifies the author of the post being published. |
| Site Admin | Notifies the site admin when you publish a new post. |
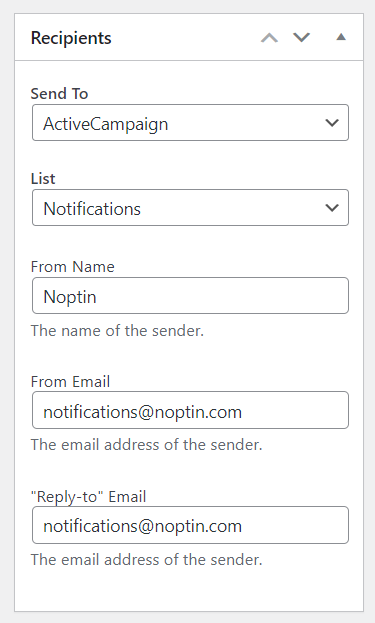
| External | If you have installed a supported integration such as Mailchimp, you can send a bulk email to the integration subscribers and filter recipients by their lists and tags. |
For example, if you run a blog, you might select Noptin Subscribers to notify everyone who has subscribed to your newsletter.
If you run a membership website, you could select WordPress Users and limit notifications to specific membership roles.
After selecting your recipients, Noptin opens the email editor.
Step 5: Customize Your New Post Notification Email
Noptin uses the WordPress block editor to let you design the notification email.
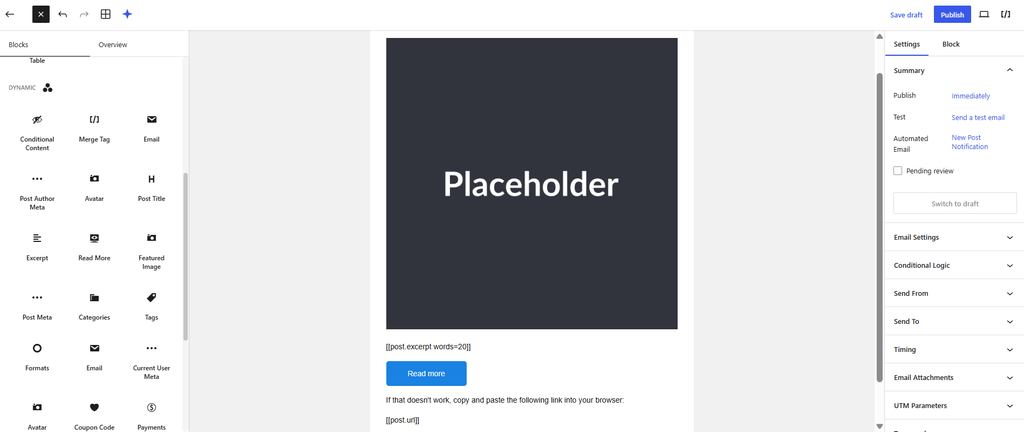
The editor works just like the regular WordPress post editor, but tailored for email. You can customize the subject line, email content, images, and links.
For example, you can change the subject to something like: “New post: [[post.title]]“.

[[post.title]] is a merge tag. Noptin automatically replaces it with the title of the published post. Scroll down to see all available merge tags.
By default, the email includes information about the newly published post, such as its title, featured image, excerpt, and a link to read the full post.
In addition to the default blocks, you can also add or rearrange dynamic blocks to including:
- The post’s featured image and excerpt.
- The post’s title and content.
- A button linking to the full post.
- The post’s categories, tags, or custom taxonomies.
- Information about the post author.
- Your website logo, introductory text, or footer.
- Custom fields from supported plugins.
Click on any of the blocks to edit or delete them.

Because the email uses dynamic post information, you only need to design it once. Noptin automatically updates the content for each newly published post.
Step 6: Choose Which Posts Trigger Notifications
By default, your notification is triggered whenever a new post of the selected post type is published.
However, you can use Conditional Logic to control which posts trigger an email.
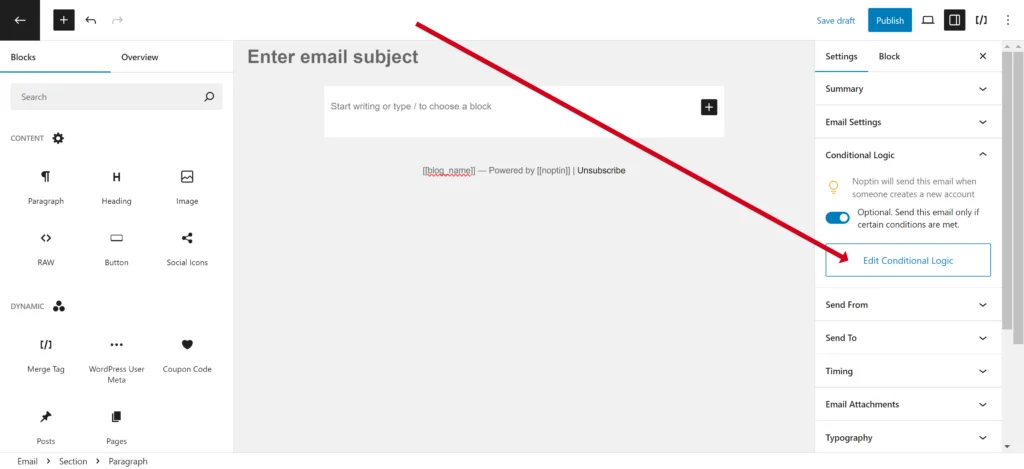
Open the Conditional Logic panel under the email settings, enable it, and click Edit Conditional Logic.
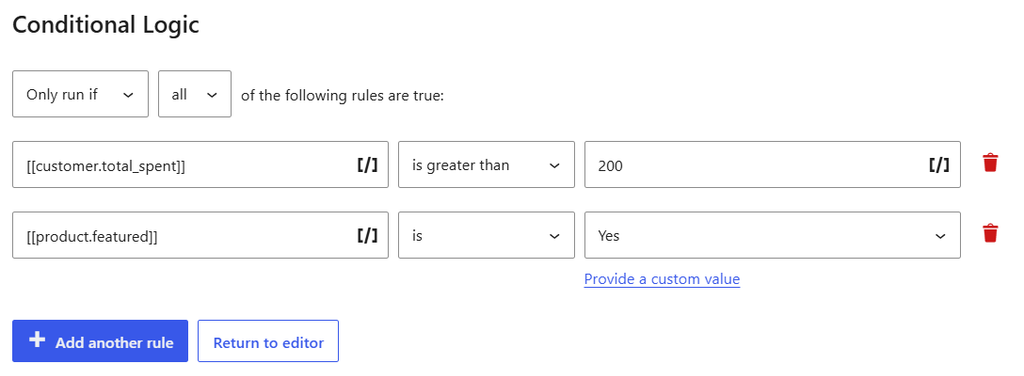
You can then create rules based on:
- Categories: Only notify subscribers when posts in selected categories are published.
- Tags: Trigger notifications for posts with specific tags.
- Authors: Send notifications only for posts published by certain authors.
- Custom fields: Send notifications when a post matches a particular custom field value.
- Custom taxonomies: Filter notifications by product brands, event types, locations, or other taxonomies.
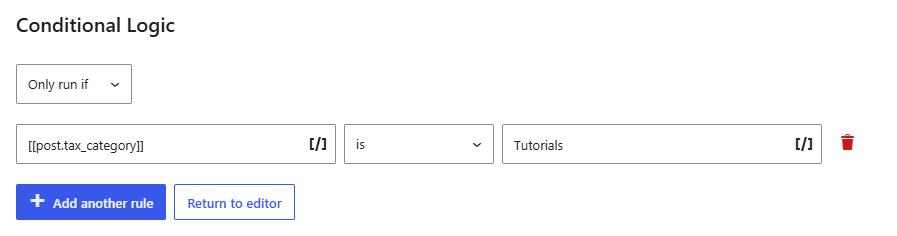
For example, you could configure Noptin to send a notification only when you publish a post in the Tutorials category.
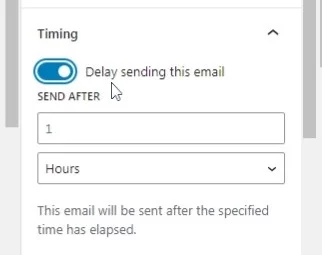
You can also use the Timing settings to delay notifications, giving yourself time to make corrections before the email is sent.
Note:
Post conditions determine which published posts trigger an email, while recipient filters determine who receives that email. You can combine both to send more relevant notifications.
Step 7: Test and Activate Your New Post Notification
Before activating the notification, click Send Test Email to preview how it looks in your inbox.

Check that the subject, images, links, and post information appear correctly.
Once you’re satisfied, click Publish in the top-right corner of the editor.
That’s it! Your new post notification is now active.
From now on, your email subscribers will be notified every time you publish a new blog post.
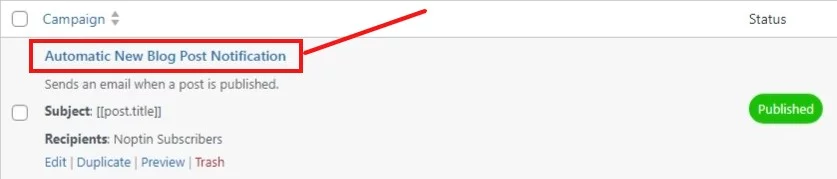
You can return to Noptin > Email Campaigns > Automated Emails at any time to edit or manage your notification.
How to conditionally send new post notifications
Conditional logic gives you precise control over when a new post notification email is sent and which posts can trigger it.
Instead of notifying subscribers about every post you publish, you can apply rules that limit notifications to specific content, such as selected categories, custom fields, or other publishing conditions. This ensures subscribers only receive emails that are relevant to their interests.
Using conditional logic helps reduce unnecessary emails, improves engagement, and prevents notification fatigue.
To enable conditional logic for your email campaign, open the Conditional Logic panel under the email settings tab and turn it on. Then, click the Edit Conditional Logic button to set the rules for when the email will be sent.
How to limit notifications to certain categories
By default, a new post notification is sent for every published post. To notify subscribers only about specific content, use conditional logic to filter notifications by category.
Important:
When setting a category, always use its name rather than the slug or ID.
How to limit notifications to certain tags
In addition to categories, you can limit new post notifications based on post tags. This is useful when tags represent topics, features, or interests that cut across multiple categories.
To do this, add a new Conditional Logic rule for Post Tags.

You can select one or more tags that should trigger the notification. When this rule is active, the email will only be sent if the published post contains at least one of the selected tags.
Important:
When choosing tags, always use the tag name, not the slug or ID.
How to limit notifications to certain taxonomies
Categories and tags are built-in taxonomies. Other plugins can add taxonomies such as:
- Product Brand
- Event Type
- Listing condition
- Region
- Etc
Noptin automatically detects and lists all taxonomies registered for the selected post type. You can use these custom taxonomies to create conditions that limit new post notifications.
Important:
As with categories and tags, always use the taxonomy term name, not the slug or ID.
Common Use Cases
Filtering by taxonomy is useful if your site relies on structured content. For example:
- Notify users only when posts are published for a specific location
- Send notifications for products in certain brands or collections
- Notify subscribers when events are added under specific event types
You can also combine taxonomy rules with other conditional logic rules, such as custom fields or tags, to create very precise notification behavior.
How to filter posts by custom fields
You can also limit new post notifications based on custom field values. This is useful when important information about a post is stored in fields rather than categories or tags.
Noptin integrates with popular custom field plugins such as Advanced Custom Fields (ACF), Pods, Meta Box, and Toolset Types. This allows you to apply conditional logic to any field that uses predefined options created with these plugins.
To do this, add a new Conditional Logic rule for the custom field you want to use, then choose the value that should trigger the notification.
How to only send posts from certain authors
If your site has multiple authors, you may want to notify subscribers only when specific authors publish new content.
To do this, add a new Conditional Logic rule for Post Author.
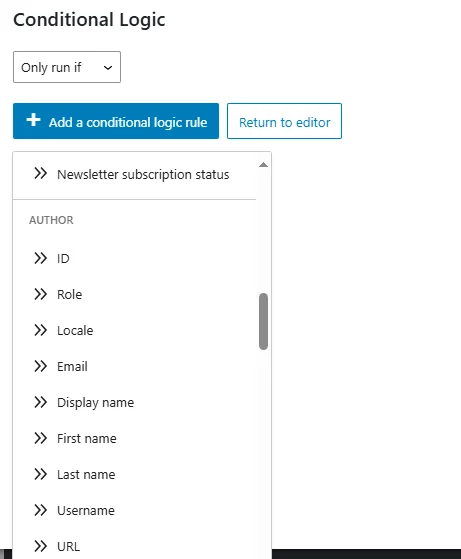
You can filter authors by their email address, user roles, locale, or ID. When this rule is enabled, the email will only be sent if the post was published by one of the matching authors.
This is useful in several situations. For example, you might want to:
- Notify subscribers only when an editor or lead writer publishes a post
- Send notifications for guest posts while ignoring internal updates
- Highlight content from subject-matter experts on multi-author sites
You can combine author-based rules with other conditions, such as categories, tags, or custom fields, to further refine when notifications are sent.
Advanced Conditional Logic
The value field of a conditional logic rule can also accept a merge tag.
This makes it possible to create advanced, personalized notifications. For example, you can configure a notification to send only when a post’s tags match a subscriber’s interests.

A common use case is:
- Store a subscriber’s interests as a custom field.
- Use a merge tag in the conditional logic rule
- Send the notification only if the post contains at least one tag that matches the subscriber’s stored value for the field
This allows you to automatically notify subscribers only about content they care about, without creating separate notification emails for each topic.
How to Send New Post Notifications to Specific Users, Lists, Tags, or Segments
You don’t have to email everyone whenever you publish a new post.
Noptin lets you choose exactly who receives your new post notifications. You can target specific subscriber lists, tags, WordPress user roles, WooCommerce customers, or contacts in external email marketing platforms such as Mailchimp.
The available filters depend on the recipient type you selected when creating the automated email.
1. Email Newsletter Subscribers When a New Post Is Published
If you selected Noptin Subscribers as your recipients, you can limit notifications based on:
- Lists: Notify subscribers belonging to specific mailing lists.
- Tags: Target subscribers with particular interests or labels.
- Custom fields: Filter subscribers using information you’ve collected about them.
- Subscription source: Target subscribers based on the form or source they used to subscribe.
For example, if you run a blog covering WordPress and WooCommerce, you could send WooCommerce-related notifications only to subscribers tagged WooCommerce.
You can also combine filters to target a more specific group of subscribers.

2. Email Registered WordPress Users When a Post Is Published
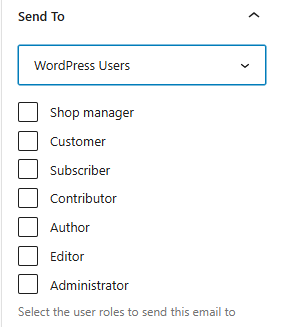
If you selected WordPress Users, you can filter recipients by their user roles or custom fields.
For example, you could notify only Editors when a new article is published, or send notifications to Members while excluding other registered users.
Noptin also supports filtering using custom fields from plugins such as ACF, Pods, and other supported integrations.
3. WooCommerce customers
If you selected WooCommerce Customers, you can target customers based on their shopping history and other customer information.
For example, you can notify customers who:
- Previously purchased a particular product.
- Placed an order within a specific period.
- Have spent more than a certain amount in your store.
- Live in a particular billing or shipping location.
This is useful when announcing new products or publishing content relevant to specific customer groups.
4. External email marketing contacts
Noptin can also send new post notifications to contacts in supported email marketing services, including:
- ActiveCampaign
- AWeber
- Brevo
- Constant Contact
- GetResponse
- Klaviyo
- Mailchimp
- MailerLite
- Mailjet
- SendGrid
- SendPulse
- Sendy
- Smaily
- VerticalResponse
- Zoho Campaigns
If you’ve installed the relevant integration, select the external service as your recipient type.
You can then use the available filters, such as mailing lists or tags, to determine which contacts receive your notifications.
For example, you could send WordPress post notifications only to contacts in a specific Mailchimp audience or segment.
Make notifications even more personalized
Recipient filters determine who is eligible to receive an email, but Noptin’s conditional logic lets you go further.
For example, you can create a notification that only sends a published post to a subscriber if the post’s tags match one of the subscriber’s interests, lists, or tags.
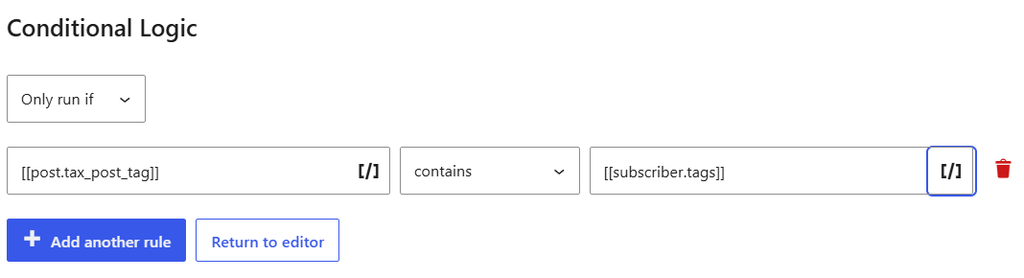
This allows different subscribers to receive different posts automatically, without creating separate notification emails for every topic.
See the Advanced Conditional Logic section above to learn how to configure these personalized notifications.
Available merge tags
Important:
Available merge tags depend on the selected post type and the plugins installed on your site. The examples below apply to standard WordPress posts.
For example, a product notification email may include merge tags for the product price and SKU. In contrast, an event notification will feature merge tags for event dates and venue.
Custom field plugins such as ACF and Pods also register additional merge tags when you create new fields.
You can use the following email tags in addition to the default email tags provided by Noptin.
Post
| Merge tag | Description |
|---|---|
| [[post.id]] | ID |
| [[post.parent]] | Parent ID |
| [[post.author]] | Author ID |
| [[post.date]] | Date |
| [[post.title]] | Title |
| [[post.excerpt]] | Excerpt |
| [[post.content]] | Content |
| [[post.status]] | Status |
| [[post.comment_status]] | Comment Status |
| [[post.url]] | URL |
| [[post.ping_status]] | Ping Status |
| [[post.slug]] | Slug |
| [[post.comment_count]] | Comment Count |
| [[post.featured_image]] | Featured Image URL |
| [[post.language]] | Language (Locale) |
| [[post.meta key=”my_key”]] | Meta Value |
| [[post.tax_category]] | Categories |
| [[post.tax_post_tag]] | Tags |
| [[post.tax_post_format]] | Formats |
Post Author
| Merge tag | Description |
|---|---|
| [[post_author.id]] | ID |
| [[post_author.role]] | Role |
| [[post_author.locale]] | Locale |
| [[post_author.email]] | |
| [[post_author.display_name]] | Display name |
| [[post_author.first_name]] | First name |
| [[post_author.last_name]] | Last name |
| [[post_author.login]] | Username |
| [[post_author.url]] | URL |
| [[post_author.description]] | Bio |
| [[post_author.registered]] | Registration date |
| [[post_author.meta key=”my_key”]] | Meta value |
| [[post_author.customer.order_count]] | Customer >> Number of orders |
| [[post_author.customer.total_spent]] | Customer >> Lifetime value |
| [[post_author.newsletter]] | Newsletter subscription status |
| [[post_author.avatar_url]] | Avatar URL |
When Are New Post Notification Emails Sent?
By default, new post notification emails are sent a few minutes after a post is published. In some cases, you may want to delay the email instead.
Delaying the email gives you time to:
- Fix typos or formatting issues after publishing
- Update featured images or metadata
- Avoid sending notifications for quickly updated or reverted posts
On the menu on the right, select Timing, then turn it on to select the amount of time to delay sending the email
Once a delay is set, Noptin will wait for the specified amount of time after the post is published before sending the email.
If the post is updated during the delay period, the notification will still use the latest version of the content at the time the email is sent.
You can combine delays with conditional logic and recipient filtering to fully control both when and to whom new post notifications are sent.
How to manually resend new post notifications
In some cases, you may want to resend a new post notification manually. For example, if the original email failed to send, you made important updates to the post, or you want to notify subscribers again at a later time.
In your WordPress admin dashboard, go to Noptin > Tools > New Post Automation > Trigger. Enter the post ID of the post you want to resend, then click Trigger.

How to check the ID of a Post.
- Edit the post you’re interested in.
- Look at the URL in your browser’s address bar.
- You’ll see something like “post.php?post=X&action=edit” where X is the ID of the post.

How to view campaign stats
Noptin allows you to see which of your subscribers opened your new post notification emails, and which of them clicked on links in the emails.
To view the stats, open Noptin > Emails in your WordPress dashboard, then find your new post notification in the campaign list.

Here you can:-
- Preview the notification email.
- Duplicate the email as a normal Noptin newsletter campaign.
- Delete the notification email.
- Stop the sending queue (in case the notification email is still sending).
- View how many subscribers received your new post notification email.
- Check how many subscribers opened your new post notification email.
- View how many subscribers clicked on your new post notification email.
- Check the date Noptin sent the new post notification email.
Why Use Noptin for WordPress New Post Notifications?
Noptin gives you control over who receives your new post notifications, which posts trigger them, and what each email contains. You can set everything up directly from your WordPress dashboard without manually creating an email every time you publish.
Here’s what you can do with Noptin:
- Notify subscribers, WordPress users, and customers. Send emails to your newsletter subscribers, registered WordPress users, WooCommerce customers, post authors, or specific email addresses. You can create separate notifications for different audiences.
- Send notifications to specific groups. Instead of emailing everyone, target subscribers by lists, tags, custom fields, or segments. You can also target WordPress users by role and WooCommerce customers by purchase history, using the relevant integrations.
- Notify readers about more than blog posts. Automatically send emails when you publish new WooCommerce products, events, property listings, courses, or other WordPress custom post types.
- Customize your notification emails. Use Noptin’s visual email editor to design emails with post titles, featured images, excerpts, author information, and links. Dynamic merge tags and blocks automatically insert information from each newly published post.
- Use AI to help create your emails. Noptin’s AI email generation feature can help you create email content, subject lines, and layouts from a prompt. You can review and edit the generated email before activating it.
- Control exactly when emails are sent. Use conditional logic to trigger notifications only for posts matching specific categories, tags, authors, taxonomies, or custom fields. You can also delay notifications or send scheduled post digests instead of individual alerts.
Manage Everything From Your WordPress Dashboard
You don’t need to switch between different platforms to create and manage your new post notifications.
With Noptin, you can manage subscribers, configure notification rules, design emails, send tests, and review campaign statistics from your WordPress dashboard.
You can use your existing WordPress email-sending configuration or connect a supported external email service to handle delivery.
Compare Noptin to other WordPress post notification plugins.
Frequently Asked Questions
Install Noptin, navigate to Noptin > Emails > Automated Emails, and create a New Post Notification email.
Choose your recipients, customize the email, and publish it.
Noptin will automatically email your selected recipients whenever a new blog post is published.
Yes.
Noptin can send new post notifications directly to registered WordPress users, even if they aren’t newsletter subscribers.
When creating the notification, select WordPress Users as the recipient type. You can email all users or target specific roles, such as subscribers, members, or customers.
Create a New Post Notification in Noptin and select Noptin Subscribers as your recipients.
You can notify everyone on your newsletter or limit notifications to specific lists, tags, or subscriber segments.
Each email can automatically include the new post’s title, featured image, excerpt, and link.
Yes.
Use Noptin’s Conditional Logic to trigger notifications only for posts in selected categories or with specific tags.
You can also filter recipients by their lists, tags, or custom fields.
For more personalized notifications, you can match post tags against interests stored in each subscriber’s profile.
Yes.
Noptin supports new post notifications for WooCommerce products, events, pages, and other WordPress custom post types.
When creating the automated email, select the relevant post type instead of regular blog posts. You can also filter notifications by product categories, custom taxonomies, or other publishing conditions.
Yes.
Instead of sending a separate notification whenever you publish, Noptin can combine recent posts into a scheduled digest email. You can send digests daily, weekly, or monthly, making them useful for websites that publish frequently.
See our guide to setting up WordPress post digest emails.
WordPress does not automatically send newsletter emails to your readers whenever you publish a new blog post.
To do this, you can install a plugin such as Noptin. Once you’ve created a New Post Notification email, Noptin automatically notifies your selected subscribers or WordPress users whenever a qualifying post is published.
You can add a Noptin newsletter subscription form to your website so visitors can sign up to receive email updates.
Next, create a New Post Notification email and select Noptin Subscribers as the recipients.
Whenever you publish a qualifying new post, Noptin automatically emails your subscribed readers. You can also use lists, tags, and segments to control which subscribers receive each notification.
If your notification emails aren’t arriving, first confirm that your automated email is published and active.
Then check that the newly published post matches your notification conditions and that the selected recipients are eligible to receive it.
You should also send a test email to verify that WordPress can send emails successfully.
If test emails work but automatic notifications don’t, check whether WordPress Cron is running correctly and whether emails are waiting in the sending queue.
See our email-sending troubleshooting guide for additional help.
Leave a Reply