This guide shows you how to install the Noptin newsletter plugin on your site.
Noptin is a free newsletter plugin that allows you to create newsletter subscription forms or add newsletter subscription checkboxes to your existing contact forms, checkout, and user registration forms.
Prerequisites
Before you install Noptin, ensure that you are using:-
- WordPress version 5.0 or greater.
- PHP version 7.0 or greater.
- MySQL version 5.7 or greater OR MariaDB version 10.3 or greater.
NOTE:
If you are in a legacy environment where you only have older PHP or MySQL versions, Noptin also works with PHP 5.6+ and MySQL 5.0+, but these versions have reached the official End Of Life and as such may expose your site to security vulnerabilities.
Check out the dedicated WordPress web hosts listed here if you need a new web host that meets the above server requirements.
Recommended Plugins
Noptin does not depend on any other plugins. However, it works with the following plugins if you have installed them.
- WooCommerce and EDD (Collect email addresses from your customers during checkout).
- Contact Form 7 (Let people sign up for your newsletter via your Contact Form 7 forms).
- Ninja Forms (Let people sign up to your email list via your Ninja forms).
- WP Forms (Let people sign up for your newsletter via your WP Forms).
- Gravity Forms (Let people sign up to your email list via your Gravity Forms).
- Elementor Forms (Let people sign up for your newsletter via your Elementor Forms).
Installation
Noptin is installed the same way you install any other free WordPress plugin.
To install Noptin:-
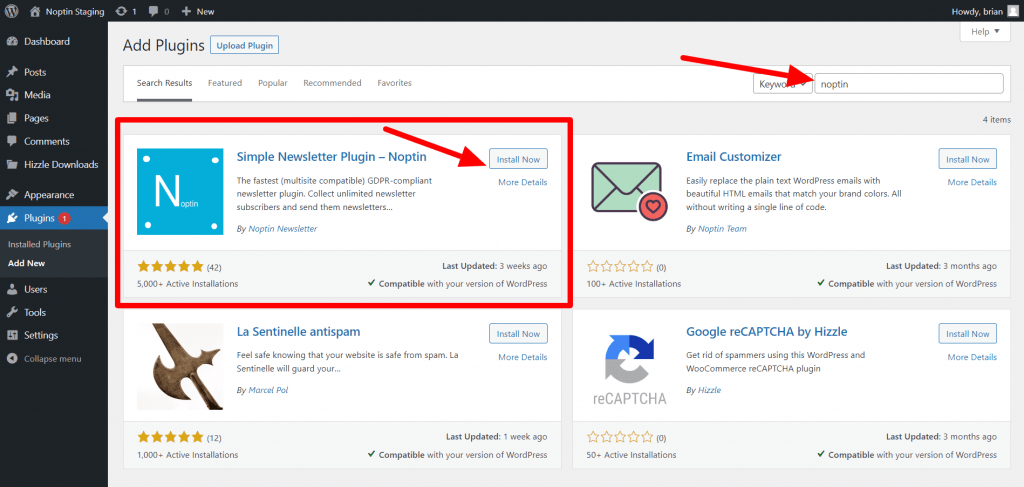
- First, log into your WordPress website’s admin dashboard then navigate to Plugins > Add New.
- Search for “Noptin”.
- Click Install Now.
- After WordPress installs Noptin, click the Activate Now button to activate the plugin.

That is all! You have successfully installed and activated Noptin on your WordPress website.
Multisite Network Installation
When used on a multisite set-up, each site in the network stores its information in a separate table. This means that each site will have its own subscription forms and newsletter subscribers.
This is will remain the case even if you network-activate the plugin.
Next Steps
Now that you’ve installed Noptin, you may want to take the following next steps.
- Create newsletter subscription forms.
- Add newsletter subscription checkboxes to your existing contact forms, user registration forms, and checkout forms.
- Send emails to your customers, registered users, or newsletter subscribers.
- Use automation rules to automate your email marketing.
Leave a Reply