This guide shows you how to create a custom newsletter subscription form. This is useful in cases where you don’t want to use the default Noptin forms and you’re using a form plugin that is not supported by Noptin.
What you’ll learn
- How to add a newsletter subscription checkbox to your custom HTML forms.
- How to automatically subscribe everyone who fills out your custom HTML forms.
Adding a newsletter subscription checkbox to your custom HTML forms
You can add a “subscribe to our newsletter” checkbox to any third-party form you like by including the following HTML in the form.
<label>
	<input type="checkbox" name="noptin-custom-subscribe" value="1" />
	Subscribe to our newsletter.
</label>
In case you’re using a form builder, add a normal checkbox field and set the field key/name to “noptin-custom-subscribe“.
Automatically subscribe everyone who fills out your custom HTML forms
Instead of using a checkbox, you can use a hidden field to ensure that everyone who fills out your form is automatically added to your newsletter.
<input type="hidden" name="noptin-custom-subscribe" value="1" />
Similar to the previous step, those using a form builder should add a normal hidden field to the form and then set the field key/name to “noptin-custom-subscribe“.
You can also follow the above steps, but use a radio or select field instead of a checkbox or hidden field.
Specifying subscriber fields
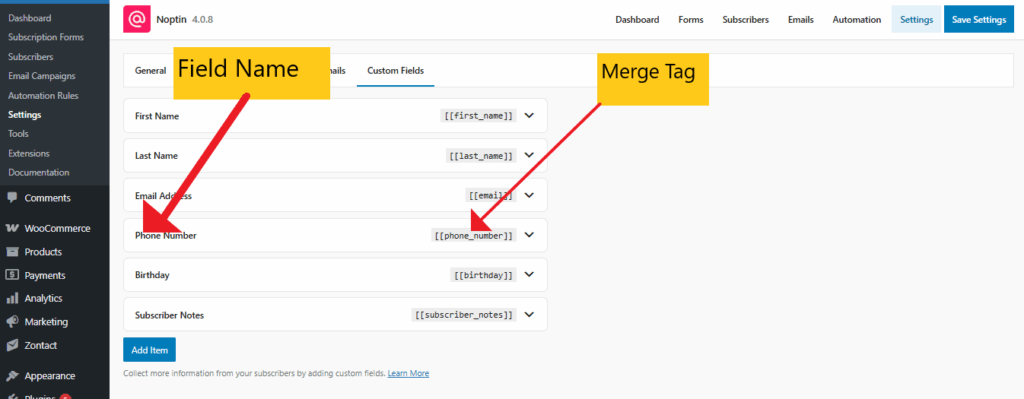
By default, Noptin will try to guess the subscriber fields. If this doesn’t work for you, ensure that the field names/keys in your custom forms match the merge tags located in Noptin > Settings > Custom Fields.

For example,
<label>
	First Name
	<input type="text" name="first_name"/>
</label>
<label>
	Phone Number
	<input type="checkbox" name="phone_number"/>
</label>
<label>
	Email Address
	<input type="checkbox" name="email"/>
</label>
<label>
	<input type="checkbox" name="noptin-custom-subscribe" value="1" />
	Subscribe to our newsletter.
</label>
Add a field with a key/name of “source” to set the subscriber source. You can then later filter your newsletter subscribers by their subscription source.
Connecting your form to external CRMs
Noptin will automatically add new submissions to any installed CRM add-ons. Below are supported CRMs and email marketing software.
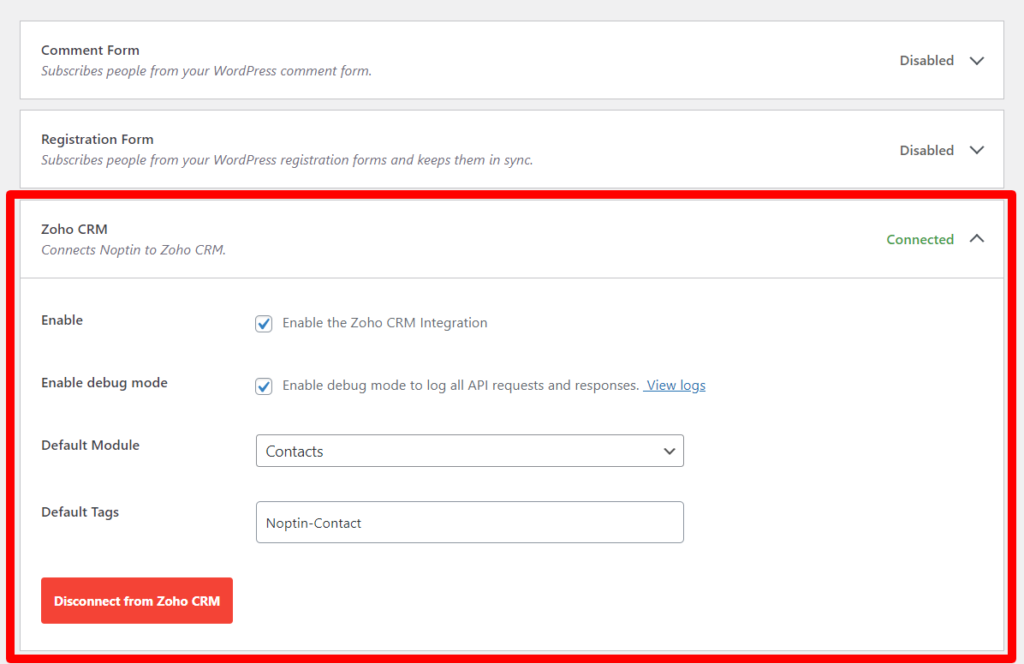
Noptin will add subscribers to the default lists, groups, and tags that you’ve set in Noptin > Settings > Integrations > Your Integration.
For example,
Assume that you have a Zoho CRM integration set up as shown below.

Noptin will add everyone who subscribes via your custom form to Zoho CRM as a “Contact” with the tag “Noptin-Contact”.
If that’s not what you want, you can add a field with a name/key with the format:-
{connection_slug}_{list_type}For example, the following form will add subscribers to a Mailchimp list with ID “12345”.
<input type="hidden" name="mailchimp_list" value="12345" />
<input type="hidden" name="mailchimp_tags" value="Noptin-Subscriber" />
You can pass -1 as the value to disable adding new contacts to your CRM.


Leave a Reply