
Add a Subscriber Manually

You can add a subscriber manually when you need to create one contact without using a subscription form or importing a file. An email address is required. The other fields shown on the page depend on the custom fields you’ve set in Noptin.

Only add people who have agreed to receive the messages you plan to send. A manually created record does not provide evidence of consent by itself.

Add one subscriber

  1. Open Noptin → Subscribers.
  2. Click Add New.
  3. Enter the subscriber’s Email address.
  4. Complete any useful profile and segmentation fields, such as name, status, tags, lists, or other custom fields.
  5. Review the values, then click Add New Subscriber.
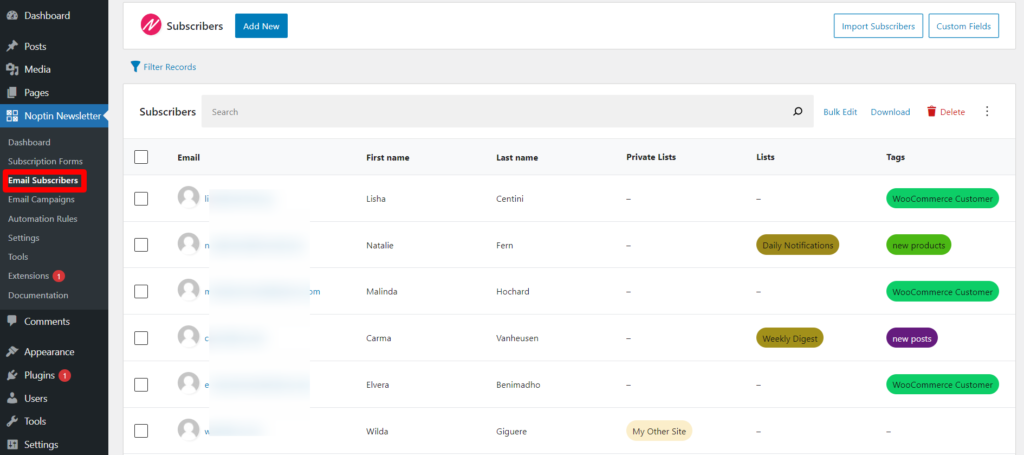
Noptin subscribers overview page

Choose the subscriber values

FieldWhat to enter
EmailThe subscriber’s valid email address. This identifies the subscriber and is required.
Name fieldsEnter the values you know. They can later be used to personalize campaigns.
StatusSelect the status that accurately represents the contact’s current subscription state.
Tags and listsAdd values that are already used to organize or target subscribers on your site.
Custom fieldsComplete only the fields for which you have reliable information.

What happens after the subscriber is added

A subscriber record is created and appears on the Subscribers page. The saved status, tags, lists, and custom-field values are available for filtering and other subscriber workflows. Automations that listen for a newly created subscriber or for a value added during creation may also run.

If the email address already belongs to a subscriber, a second subscriber should not be created. Search for the address and edit the existing subscriber instead.

To add many contacts, prepare a CSV file and follow Importing Subscribers. Importing is faster and lets you map columns to the same subscriber fields.

Related Guides

  • Bounce Handling

    How to automatically delete subscribers who bounce or report your emails as SPAM

    Read More

  • Sync Subscribers

    Have you ever wished you had several newsletter sign-up forms on different websites that all collected subscribers into a single newsletter list? This guide shows you how to do that. Step 1: Create a listener on the master site. Open one of the sites and then create an automation rule that listens to incoming webhooks…

    Read More

  • Custom Fields

    One of the most powerful features of Noptin is its support for custom fields. You can use custom fields to store more information about your subscribers (such as their phone numbers and birthdays). This guide shows you how to create and edit custom fields. Creating Custom Fields To create a new custom field:- First, visit…

    Read More

  • Importing Subscribers

    Learn how to import subscribers from another system into Noptin.

    Read More

  • Subscriber Lists

    Learn how to use subscriber lists to organize contacts, target specific audiences, and send more relevant email campaigns in WordPress.

    Read More

  • Tagging Subscribers

    Learn how to manually or automatically tag or untag subscribers based on how they signed-up and the actions they take on your site. You can then filter email recipients by tags

    Read More

  • Double Opt-in

    This guide shows you how to enable double opt-in and how to edit the double opt-in email. Double opt-in means that subscribers will not receive any marketing emails unless they confirm their email addresses.

    Read More

  • Unsubscribing

    To comply with the CAN-SPAM Act and other email sending requirements, Noptin automatically adds a List-Unsubscribe header to every email it sends. This header allows email clients (such as Gmail and Apple Mail) to display a one-click unsubscribe button directly in their interface, making it easy for subscribers to opt out without even opening your…

    Read More

  • How to block newsletter subscribers

    Blocked subscribers are permanently excluded from your list—they won’t receive emails, and they can’t be re-added through forms, imports, or integrations.

    Read More

  • Automatically delete non-confirmed subscribers

    If you’ve enabled double opt-in, you can set up an automation rule that automatically deletes any subscriber who does not confirm their email address after a certain period. To do this:- First, open your admin dashboard and then click on Noptin > Automation Rules to open the automation rules overview page. Next, click the “Add…

    Read More

  • Deleting Subscribers

    Delete one subscriber, selected subscribers, or every subscriber matching a filter, and understand when unsubscribing or blocking is the safer action.

    Read More

  • Exporting Subscribers

    How to download your subscribers or only a segment of your subscribers.

    Read More