Use the image block to display images in your email newsletter.

How It Works

Choosing the Image

There are three ways you can select the image to display:-
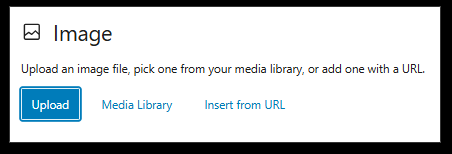
Choosing the image
  1. Upload an image from your local computer.
  2. Select an image from your WordPress media library.
  3. Manually enter a URL to the image.

Image Block Toolbar

The Image block toolbar has options to:-

Image block toolbar
Image block toolbar
  • Set the image alignment:- either left, right, center, or none.
  • Add a caption to the image.
  • Link your image to an external URL.
  • Crop and resize the image (if you selected your image from your media library).
  • Upload the image to your media library (if you manually set the image URL).
  • Replace the image.

Image Block Sidebar Settings

Select Block at the top of the right sidebar and then customize the image as needed.

For example, you can select the image size to display…
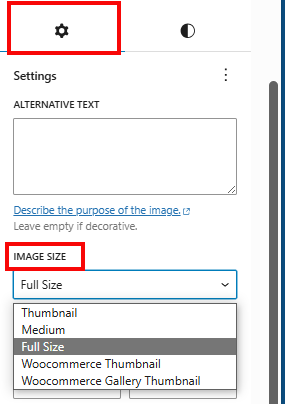
how to resize image in visual email editor

… or change the margin, padding, and border settings.
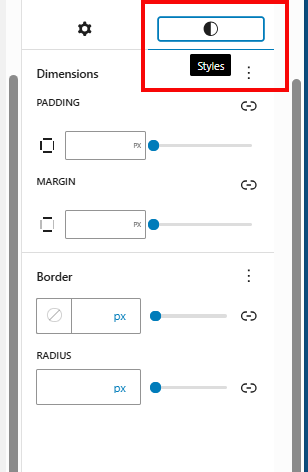
how to style image block in Noptin visual email editor

Email Client Compatibility

General Compatibility

  • Supports JPG, PNG, and GIF formats.
  • Preserves aspect ratio.
  • Handles mobile responsiveness.

Outlook-Specific Behavior

  • Older versions of Microsoft Outlook calculate percentage-based widths and heights using the image’s original dimensions, not the container width.
  • Example: For a 1000px wide image, setting the width to 50% makes it 500px wide in Outlook, regardless of the parent container.
  • To fix this, ensure that the images you use are properly sized to prevent them from overflowing their containers.

Tips

  • Use compressed images to reduce load time.
  • Always add alt text.
  • Test across multiple email clients.
  • Consider Outlook’s percentage behavior when sizing images.
  • Ensure your email still looks okay even if the email client blocks images.

Related Guides

  • Columns Block

    The Columns Block allows you to add different types of columns to your email Adding Columns Select Columns: In the block, select the type of column you want to use. Add Content: Click within each column to add content. You can insert other blocks (like images, headings, or paragraphs) into each column. Increase/Decrease Columns Column…

    Read More

  • Separator Block

    The separator block in Noptin visual email editor creates a break between two blocks of content with a horizontal line. This helps create a separation between ideas or sections in your content or email Adding a Separator Block Open the visual email editor in Noptin On the left panel, Select Separator to add the separator block in…

    Read More

  • Spacer Block

    The spacer block in visual email editor in Noptin allows you to create space between two blocks. To add a horizontal space (between blocks in a row), the spacer block has you covered. Adding a Spacer Block Block Toolbar Options Transform Convert the Spacer block into a Columns or Sections block. Click on the Spacer button on the tool bar to…

    Read More

  • Heading Block

    The heading block helps you structure your email content into sections.

    Read More

  • Paragraph Block

    Besides adding text, the Paragraph block offers various formatting options to customize text content. It lets you make the text bold, italics, and strikethrough.

    Read More

  • List Block

    The list block helps you create ordered (numbered) and unordered (bullet) lists in your emails.

    Read More

  • Button Block

    The button block displays eye-catching calls to action in your emails.

    Read More

  • Custom HTML Block

    The custom HTML block lets you add custom HTML code directly to your emails.

    Read More

  • Social Icons Block

    The social icons block helps you add social media links to your emails.

    Read More

  • Table Block

    The table block lets you organize content into rows and columns.

    Read More